Pages

Wednesday, May 22, 2013

How to Make Your Own Cleavage Cover Up (Out of an Old Shirt)

If you have any old shirts just laying around, whether they no longer fit quite the way you'd like, they are no longer your style, or they have become stained or ripped, think twice before you toss them in the trash. This is the first of a few different projects that I have planned for some of those old shirts of mine that are no longer useful to me in their current state. Follow along with the pictured instructions below to learn how you can easily and inexpensively make your own cleavage cover ups out of old shirts.


1. First things first. Find a shirt or three or four that you would like to use. Make sure that you choose colors that will go well with the shirts that you will be using your cover ups with.

2. Next you need to measure the distance between your bra straps. If you do not have measuring tape designed for sewing, improvise and use the measuring tape in your tool box or even a ruler will work. When measuring you will need to be wearing your bra and measure from the outer edge of one strap across to the outer edge of the opposite strap. For me that came out to 9 1/4 inches. 

3. Then measure the distance from where you would like your cover up to sit on your chest to the bottom of your bra in the front. I suggest using a starting point on your chest that is higher than you may actually desire. Doing so will give you a little extra material to work with in case it is needed for a different shirt and will have no effect on the look of completed project. I ended up making mine 7 1/2 inches long.


4. Now that you have your measurements, lay the desired shirt on a flat surface and draw little dotted lines to mark off the amount of material you will need for your cover up.


5. I then chose to cut a block of the material from the shirt larger than the area I needed. I did this so that it was easier to cut along my lines than it would have been to work with a full shirt.


6. Cut along your dotted lines to make a square of material to the desired size. Instead of cutting the piece into a square you can also cut the bottom section so that it is slightly rounded. I chose not to do so in case I want to use the cover up with a shirt that has a larger opening in the front which would require a little more material to cover. 


7. Next you will need to make straps for your cover up so that you can attach it to your bra. I decided to use the straps from an old tank top. However you can also use velcro or ribbon.


8. If using straps from an old shirt, bra or any other article of clothing that has straps, simply remove the straps by cutting with a pair of scissors.


9. I chose to cut the whole strap off so that I could save it for another project or to make multiple cover ups.


10. Remove any hardware from the strap. You may be able to use the hardware to make your cover up straps adjustable, however I have not taken the time to figure out how best to do this yet and it is not necessary. 


11. Take the full length of strap you removed and wrap it around your bra strap. If you have bras with straps of varying widths, I suggest using your widest strapped bra for this measurement. Doing so will help prevent your bra straps from bunching and being uncomfortable.


12. Now you will need to make a hole for your button. You can use sewing scissors, a utility knife or really any knife with a sharp point. Make sure that your button hole is not too large that the button will not hold, but large enough that the button can slip through the hole easily. You can also choose to make two button holes so that you can adjust how snugly it wraps around your bra strap. 


13. Using a needle and thread start attaching your strap to the top side of your cover up material. Make sure that you are attaching the unbroken side of your strap, or the side without the button hole.


14. Once you have gone over the loose end of thread a few times, slide your button onto your needle and thread and place it against the strap. Hold the button in place and attach it securely by weaving in and out of each hole within the button a few times. I went through each hole 5 times to make sure it was secure.


15. After you feel that the button is secure, end your stitch by weaving your thread through the front side of your material. I did this twice going first one direction then the opposite just to ensure that the end of my thread did not come lose and cause my stitching to come out. 

Note: As you can see from my stitching I am not terribly skilled at stitching by hand. Since this section of the material will be covered by your shirt it is not necessary for it to look overly pretty. 


16. Now your strap is complete. All you need to do to attach it to your bra is wrap it around your bra strap and secure it by slipping the end onto the button.

17. Once you have the cover up attached to your bra simply put your shirt and adjust your cover up to the desired height. You can let the bottom of the cover up hang or you can tuck it into your bra for a little extra sense of security. Below are a few pictures of the cover up at different adjustment heights. 

18. There is no need to sew the edges of your cover up but if you are proficient with a sewing machine and have one available you can chose to do so. There is no need to make adjustments to the beginning measurements if you do chose to sew the edges. 

19. If you do not sew the edges they may curl after washing. To help prevent this, lay the cover up on a flat surface and lay a towel over it to dry. 


Here I have the cover up adjusted for moderate coverage.


Here I have the cover up adjusted so that it adds just a little extra coverage. 


Here I have the cover up adjusted so that it offers full coverage.

I hope that this tutorial has been helpful and that you find it easy to follow. If you have any questions or suggestions on this project or any others that you'd like me to try please leave a message in the comment section. Thanks for taking a look and for all of the support.

Monday, April 8, 2013

How to Make Your Own Stuffed Animal Hammock

Do your children have an over abundance of stuffed animals? Have you tried to sort through them in order to get rid of at least a few, but have been met with resistance? Well your not alone. With three children (two of which share a room) in a three bedroom home, there are times that I feel like the stuffed animals are going to overtake my home. I must admit that some of that is my fault as well. See my daughter has a pretty diverse collection of stuffed animals and to be perfectly honest I have problems myself with getting rid of some of them.

One day I suddenly recalled that a childhood friend of mine had this totally cool hammock in her room for her stuffed animals. So the search was on. Now, I do buy some things off of the internet but I also try to support my local businesses by purchasing products locally. However after searching every store in town and several of the big name chain stores in the surrounding area I was unable to find even one of these hammocks. That was a pretty big disappointment.

Here I was thinking I had found the perfect solution to my problem and then it's a no go. After much thought I realized that during my search I had run across several different styles of the mesh laundry bags. Since these can be very inexpensive I decided to buy one and see if I could somehow make my own stuffed animal hammock. Luckily it was a success and this is how I did it for under $3.00.


Remove the mesh laundry bag from the package.


Remove the handle (tag) from the side. At first I tried cutting the stitches to remove the tag but found it was much easier and no less appealing to the eye to just cut the tag itself off. Just be sure that you make your cut as close to the mesh bag as possible without cutting it.


Once the tag is removed find the seam on the side of the bag. I chose to start on the side where the strings come out of the string loop. Use the line of holes closest to the seam as a guide.


Cut along the length of the seam. You can cut down the whole length but I chose to leave about 1 inch at the bottom of the bag intact. This helps to add a little extra strength and a bit of a pocket that holds larger stuffed animals better. 


Remove the string. This can be done before any cutting is done but I did it after I cut the first seam.


Now find the dotted line on the opposite side that is closest to the seam. 
Once again cut down the length of the bag.


If you leave a portion of the seam intact like I chose to do, 
be sure to do the same with the other side as well.


Taking both ends of the string that was removed from the bag earlier, find the center of the string.
Cut the string into two pieces.


Next restring the hammock. Do this by using an old metal clothes hanger or long piece of wire as a stringer. Insert the hanger or wire all the way through the string loop on one side of your hammock. Once your hanger is fully inserted through to the end of the string loop, tie one piece of string to the end of the hanger.  


Then slowly pull the hanger with attached string back through the string loop until only the string is left in the string loop. Be careful not to go to quickly or the string may fall off of the hanger or you may rip the mesh.


Take both ends of the string and tie them together in a tight knot. Then repeat all of the above steps for stringing to string the other side of your hammock.


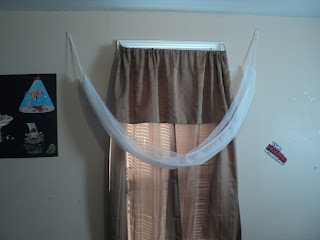
Choose where you want to hang the hammock. Unfortunately this room in my house only has two corners and both of those are at the head of the kids' beds. I didn't like the idea of hanging something like this over my children's heads just in case so I chose to hang it over the window (good thing because after hanging it I discovered that this was the only area where there was enough space to hang it). 


I used plain screws to hang my hammock and have had no problems. However I would advise against using nails for hanging since they would run more of a chance of getting pulled out of the wall. If you want to use something that is a little more appealing to the eye, use screw in wall hooks. These can be purchased at practically any retail or hardware store for very little cost.

After making this piece I decided to break down and search the internet to find out if these types of hammocks were still being made and if so approximately how much they would cost. From what I have found they can range between $12 and $75 depending on the style and maker. However I am very happy with the results especially when I consider that I paid less than $3 to make one myself. 

Thanks for stopping by, I hope you enjoyed my latest project.

Monday, March 11, 2013

Getting a New Pet

Pets of all shapes, sizes and types are fun to have and can increase your mental health and increase the quality of your life. However no matter what type of pet you are wanting you should always consider what kind of care they will require before acquiring the pet. Some pets do not require as much care and maintenance as others. For instance a goldfish may be able to live a long and full life in a simple goldfish bowl  with regular cleaning and proper levels of feeding. Where as a dog requires feeding, cleaning of areas where the dog eliminates waste, training and exercise along with regular checkups and vaccinations. So it is highly important to know what responsibilities come along with any type of pet you plan on having.

That being said we recently added a new member to our family. We opted on a dog so that the kids would have a playmate (and to be honest the decision was made to also help eliminate some of the hassles of raising kids like food on the floor). Since we have owned dogs and puppies previously we were already aware of the care requirements and hassles that come along with a dog. Having that knowledge helped us in making a decision on what type of dog we wanted to get, and the age of the dog. Even so we did not take the decision lightly and took time to look around before making a choice.

While puppies are adorable and it is nice to have a dog from the start so that you can train them the way you want them to be trained, they also require a lot more time and discipline on your part than a dog that is a little older. That is why we decided to get an older puppy or adult dog versus a brand new puppy. We also decided that it would be better to go through either an organization that provides care for lost, abandoned and unwanted animals or a private individual that would put the dog into a shelter if a new home was not found in a timely manner. We used petfinder.com and craigslist.com to search our local area for available dogs that met our requirements.

We found many dogs with great qualities that we really liked but there was one that stood above the rest for us. His name is Jake, he is an 8 month old black lab, boxer mix which we found on craigslist. The previous owners were in the military and were getting ready to leave the military and move back to their home state. They loved Jake very much but they were concerned about taking him with them, since they were going to be staying with family temporarily until they found work and a home of their own.

Jake laying next to our sleeping 2 yro son Cole.

Jake had 2 homes prior to ours. His first owners had several dogs and decided to give him away because they did not feel they had enough time for him (that is pretty much the extent of what I know about his first home). He moved into his second home when he was just under 6 months old. There they worked on potty training, kennel training and teaching him some basic commands. However they did not socialize him very well so he is leery of strangers. This was very evident when we went to meet him. For the first 20 minutes that we were there he did little else but bark and growl at us. 

After some time and not a few treats, Jake started to warm up to us and started playing outside with the kids. Since he had never been around kids before and we have 2 pretty young children it was extremely important for us to know that he would behave himself with the kids. As shown in the picture he has warmed up to our family nicely and gets along great with the kids. The only problems that we have continued to have with him are that he is still pretty leery of strangers and that he will try to take food from the kids before they are done with it. We are working on both of these things along with enforcing stricter obedience when told to come and stay. 

To sum it all up I would highly recommend that you consider adopting a pet from a local shelter, rescue organization or someone that is unable to keep the animal. These animals can and often do make great additions to families and can be even more loving than a new puppy since they have also known what it is like to not be loved. Although I recommend at least considering this option when obtaining a new pet, I also recommend that you meet the animal first to help ensure that the animal is the right fit for you and your family. While these animals may require extra time and training above what they have already received the same is true for a puppy and really how can you resist giving a beautiful and loving animal a loving home if you have the option. 

Wednesday, January 30, 2013

Build a Brain

Build a Brain......You may not think that this sounds like a fun thing to do, but you would be wrong. Jarett (my oldest son) got a really neat kit for Christmas that requires you to build a brain and skull. It also comes with a book filled with lots of fun facts about our brains. Below are pictures of each step of building the brain and skull. At the very end I will share a few of the facts that Jarett and I found the most interesting.


Here is everything that comes in the kit. We did not find the knife, scalpel or tweezers of  use.


Here are the various pieces of brain that will need to be put together, I will give a few details about what each piece is and how they function later.


These are all of the pieces of Skull that will need to be put together.


The orange piece represents the spinal cord. Attach the spinal cord to the base and place the vertebrae on the spinal cord.


Next you attach the Occipital bone on the spinal cord. This bone makes up the lower back section of your skull.


Now you attach the left and right Temporal Bone on the sides of the Occipital bone. These bones make up the lower sides of your skull.


Now you are ready to attach the face of the skull. This piece includes the Sphenoid, Ethmoid and 13 other smaller bones as well as the eyeballs. These pieces are all together as one piece since these bones are small and would make the model much harder to put together as well as less stable.


These little brown pieces are the left and right sides of the Cerebellum. This part of the brain receives signals involving sensation and the intention of movement from the Cortex, then sends out instructions on how to preform the movements. So in other words if you didn't have this part of your brain your body wouldn't know how to preform even the simplest movements needed to move your fingers to scratch an itch.


Place these pieces together, all of the pieces of the brain are a little sticky so they will hold together.


Here are the two lower pieces of the Cerebrum, this is the largest part of your brain. The two pieces make up the left and right hemispheres. The left hemisphere usually specializes in functions involving arithmetic, language, and verbal memory. The right hemisphere usually specializes in functions involving music, interpreting the things you see and nonverbal memory.


Attach these two pieces together by inserting the peg into the hole.


These two pieces are the top of the Cerebrum. Both the left and right hemispheres of the Cerebrum are split up into four Lobes. They are the: Frontal Lobe, which deals with thought and judgement; Parietal Lobe, which deals with spatial sense and integrating information from your senses; Temporal Lobe, which deals with hearing; Occipital, which deals with vision.


Press these two pieces together, since they are heavier they do not stay together real well until they are attached to the other pieces, to help keep them together you can flip them over so the round side is facing up while assembling the rest of the pieces.


These are the left and right sides of the Brain Stem. Your Brain Stem connects your brain to your spinal cord, in fact as you move down the Brain Stem it becomes the Spinal cord.  The top wrinkly part of the Brain Stem is called the Cortex. The Cortex is folded and wrinkly so that tremendous processing power can be stored within the small confines of your skull. The lower section of the Brain Stem is called the Medulla. The Medulla is quite small but is the section that information travels from your brain through your body, telling each and every part of your body what it needs to do. 


Place the pieces of the Brain Stem inside the indentations on the top pieces of the Cerebrum.


Now place the bottom of the Cerebrum over the top pieces of the Cerebrum and the Brain Stem. Inside your head these pieces are not separated but in order to build a model of the brain they need to be so that the Brain Stem can be placed inside.


Next place the two pieces of the Cerebellum snugly into the dip of the Cerebrum and up against the Brain Stem.


Now that the Brain is fully assembled place it into the bottom section of the Skull that was assembled earlier, with the Cerebellum towards the back section of the Skull.


These are the left and right Parietal Bones that make up the back half of your skull.


Snap the two Parietal Bones together.


Then attach them to the bottom part of the Skull model and over the Brain. It takes a little stretching and was a little difficult to get properly in place.


Here is a frontal view of what the model looks like at this point.


Now attach the Frontal Bone, covering the rest of the Brain.


Side view


Remove the assembled Skull from the orange Spinal Cord and flip it over. Attach rubber band to the hook on the bottom side of the Skull. Then take the Mandible (lower jaw) and place it into the Sockets (little duvets on the bottom of the Skull, attach the rubber band to the two hooks on the Mandible.


Flip the Skull over and place it back onto the orange Spinal Cord.


Here is a side view of the completed Brain and Skull model.


The Jaw can move up and down with the slight touch of a finger.

Now that I have shown how we put the model together I will share a few of the Brain Facts that Jarett and I found interesting, all of this information was found in the booklet that comes with the kit but I have changed some things into my own wording I will put an * next to everything that I have taken word for word from the booklet. The kit is a Smart Lab product and is called HEADS UP! and is the Brainchild of Ben Grossblatt. 

Brain Facts

  • At birth you brain is relatively smooth, but as you grow your brain becomes wrinkly.
  • As you are likely to know babies go through a faze called babbling or cooing, what you may not realize is that deaf babies go through a similar faze. Deaf babies with parents who use sign language babble with their hands. *Instead of saying"bababa," they repeat certain nonsense hand gestures!
  • There are different sections of your Cortex that handle touch signals from the different parts of your body, the *more sensitive body parts have more Cortex devoted to them. *If you were built so that the size of each part of your body matched the amount of cortex devoted to receiving touch information from it, among other parts of your body your lips, tongue and hands would all be huge.
There is a ton of other really interesting information and great facts, making this a great tool to help children learn about and understand the workings of the brain and how the brain makes the body work. There is also a little IQ test sample and a quiz to help you discover if you are a right brained or left brained person. If you are looking for something that is both fun and educational for your child I highly recommend this kit. It was lots of fun to put together and learn about how the brain works. Plus Jarett thinks it makes a cool decoration for his bedroom.